Feeds:
Posts
Comments

2013 in review

The WordPress.com stats helper monkeys prepared a 2013 annual report for this blog.

Here’s an excerpt:

A San Francisco cable car holds 60 people. This blog was viewed about 3,200 times in 2013. If it were a cable car, it would take about 53 trips to carry that many people.

Click here to see the complete report.

The Family Table

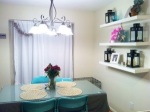
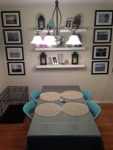
My great-grandmother Florence was an amazing hostess.  We would go to her home and she would put out these beautifully organized lunches, everything set out just so.  In my memory, the table that we ate at was huge.  It had a glass top.  When Florence passed away, her dining room table became mine.  It went with me to my first adult apartment and spent several years at my parents house until it came to live with Justin and I at our home.

20131125-091844.jpg

Tell me what you really think of the table, dear.

The finish was perfectly fine, but it felt like it just kind of blended into the rest of the floor around it.  The legs were pretty beat up, too.

I saw this pin on how to create a driftwood finish on wood.  They used a product from Driftwood DIY from here.  I bought the kit with the intention of trying it out on the dining room table and if it worked beautifully, as I knew it would, I had other projects in mind too.  I suffer greatly from “it will work out -itis” and have a concurrent diagnosis of “buy it now because you might need it someday syndrome” as well.  If I didn’t love to throw stuff out, we would certainly be living in a hoarding situation.

The first thing I had to do was drag the table out to the garage as it would need to be stripped.  The woman in the tutorial stripped her table inside her house.  I’m going to assume she does not have dogs or a toddler.

I used a citrus based stripper.  It was as non-toxic as such a thing could be, but did come with warnings about avoiding getting it on your skin because it would burn.  Don’t do what I did, but I applied the stuff while wearing flip-flops and was just fine.  You do want to wear gloves though.  Even I didn’t skip that step.

20131125-091908.jpg

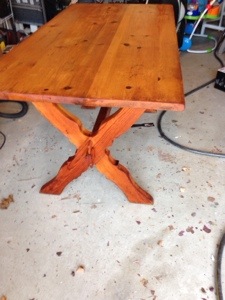
After letting the citrus stuff work its magic and spending what felt like several hours scrapping off something, I ended up with…tada!   A table that was exactly the same color as when I started except for some of the gunk on the legs came off.  Boo says I! Boo!  In retrospect, I’m not sure exactly what I thought was going to happen.  Perhaps that it would be restored to its virgin wood status?  Oh well.  Moving on, I wiped everything down with mineral spirits (to which Justin said “ohhh spooky”) and sanded off any leftover citrus gunk in preparation for applying the driftwood finish.

Again, had I put any real critical thinking skills into this project, I would have quickly surmised that since the stripping process did not yield the same light-colored wood as the woman in the tutorial, how would I end up with the same results.

I prepared the packet of driftwood stain as instructed and lightly brushed it on.  The website said that I should see a graying occur fairly quickly, as in twenty minutes or so with the color deepening over a twenty-four hour period.

So 20 minutes in, it looked like this:

20131125-091936.jpg

I like how the garage looks like a sad kid holding cell.

The next fifteen times I opened the garage door to look at it, it still looked just like that.  The legs that I spent hours scrapping gunk out of were back to looking dark.  The top went from very orange to a brown orange.  This is where I decided it was a good time to go out for drinks.  Drinks make everything better.

I had officially taken what was a perfectly reasonable family heirloom and done this.  For about a half an hour on Sunday, I thought about how to create a worthwhile story of how the table, that I swore on the family bible to keep forever, managed to be the only thing stolen from our house in an odd robbery.

This is probably a good time to mention that I’ve been over the shabby chic chalkboard painted furniture with the edges sanded down thing for a while now.  It is just so overdone and those pieces really seem to dictate the style of a space in a very, very specific way.  I see a shabby chic piece of furniture and I expect to see your stack of Domino magazines and a bunch of clutter that you call decor, too.

Since I couldn’t in good conscience arrange to off the table and it is Thanksgiving week and we needed it anyway, I pulled out some gray paint from when I thought I might repaint our entire house, added some water and slopped it on.  It was my only choice.

20131125-091926.jpg

Immediately after I applied the paint, I went back with a clean rag and wiped off the excess, making sure that the wood grain was visible underneath.  I went back over everything with sandpaper, pulling up some of the paint to give the top a more weathered look.  Honestly, I felt like a failure at this point.  You know how when you are doing a project and you have such great expectations of how it will turn out and at the end of hours and hours of work, it just is nowhere near where you wanted it to be?  I can’t be the only one who has ever felt that way.  I let the table dry and because I just wanted it all to be over, I had Justin help me carry it back into the house.

It will do for now.  I will in all likelihood add a layer of white paint just to give it a little more depth.  At night, the color almost looks blue and Justin swears that it looks purple to him.

20131125-092002.jpg

So, I’m sorry ghost of Great Grandma Florence.  They can’t all be winners.

Happy Thanksgiving!

-Kate

A Fall Tradition

In our house, we tackle our biggest projects in the Fall.  Last year it was parenting and Hurricane Sandy damage.  The year before, the kitchen project that nearly killed me (hyperbole, it was only 20+ stitches to the face).  Wood floors, appliances, hot water heaters and furnaces, it all seems like the short, dark days bring out the project manager side of us.

Labor Day weekend we took a quick trip to Florida to visit my gorgeous sister-in-law, Kate and her family.  We returned to find water coming through the ceiling into our kitchen.  Not ideal.  The  upstairs bathroom that was ugly but functional had gone rogue.

20131111-143922.jpg

20131111-143749.jpg

Justin and I had always envisioned eventually re-doing the master bathroom, but not so much the year after we had a kid and were committed to some seriously crazy daycare costs.  After weighing the pros and cons of dealing with the immediate issue only or a full-scale demo and remodel, we chose the latter.  Our thought process was that if not now, when.  As parents, probably never.  There will always be something else more important to save for.

My husband is on to me.  I bet he wishes that I were more of a candy crush fan versus ardent Pinterest groupie.  He knows that gleam in my eye when I’m quietly scrolling through all the home decor pins means nothing good for him.  He isn’t wrong.

My original plan for the bathroom was white subway tile as far as the eye could see, or in this case, floor to ceiling in a new tub-free standing shower area, paired with a tileable shower pan with a gray hex tile and some beautiful frameless glass doors.  Finish that off with a new white vanity and eco-toilet and call it a day.  I even started a Pinterest board just for the project.

With the contractor hired (About the House LLC of Milford, CT – cannot say enough about how great they are), we were ready to pull the trigger on a massive purchase of white subway tile when Justin said, “Are you sure you want to do white subway tile?”  Well, I thought I was sure.  Those were all the pictures I had pinned, I whined in my head.  It seemed pretty timeless.  Everyone else was jumping off that bridge.

“Are you sure…”

With my designing ego a little bruised, I went back to the Pinterest boards searching.  I didn’t know for what exactly, except that it had to pass the “are you sure” test.  When I am in project mode, I have laser, unrelenting (read: annnnnnooooying) focus.  Ideas fly a mile a minute, emails with links to this and that and how about combining this look with these floor tiles are drafted and sent.  Back before we had the flood that started all of this mess, Justin had once expressed interest in having wood-walled bathroom, like all of those great beach house outside showers.  Real wood wouldn’t work inside, but ceramic tile with wood grain look to it might.  I was off.  We live across the street from the Long Island sound, and because we are in a condo, we can’t have our own outdoor shower oasis, why not recreate that same look and feeling inside.

With those parameters in place, we tried to create a room that captured that “on vacation, just coming back from the beach on a beautiful summer day and standing in that refreshing outdoor shower washing off all the sand” feeling.

20131111-144018.jpg

We picked Benjamin Moore’s Palladian Blue for the walls, which shifts from green to light blue, depending on the lighting, a classic white vanity with a light gray granite counter top (an homage to the kitchen), wood plank ceramic tile from floor to ceiling and instead of a tileable shower pan, a solid white one that had a pebble-like detail etched into the base of it.  The shower door, Allen + Roth, 3/4 inch glass, was an absolute steal from Lowe’s, so much so that I won’t tell you the price so that you can think it was much more expensive than it is.

20131111-144006.jpg 20131111-143957.jpg

Now all that is left is adding some useful accessories.  While it would not have been our top choice for a fall project, I am glad that fate forced our hands to get it done.

-Kate

Before our daughter Audrey was born, I was a bit of a clothing hound. I love finding good deals and cool vintage pieces that no one else has. I’ve never been comfortable spending big $$$ on one item, so I’ve built my current wardrobe with a lot of sale pieces, mixed and matched from Target, Old Navy, JCrew, the Loft, my former go-to, the Talbots outlet and of course, Etsy’s vintage clothing sellers. Just how much did I love my clothes pre-kid? During Hurricane Irene, I evacuated my closet to an interior room of the house for safe keeping.

Something happened after I had Audrey. I found that I was much more interested in getting her all dressed up and less so in making myself look presentable. Whatever I wore to work had to be “nursing and pumping friendly”, which was limiting. It took me a while to move past bulky sweaters and whatever pants didn’t have baby spit up on them. Wrinkled, too? Oh well. I would feel great until I dropped the fabulously dressed Audrey off at daycare and looked down at myself. How was I okay leaving the house looking like this?

It was time to get back into my closet and put in some effort towards how I looked.

Now, for any other nursing/pumping moms out there, we all know that there are “nursing friendly” clothes available. They have odd flaps to be able to pull out what you need. They are made of a mystery stretchy fabric that is supposed to be kind to your postpartum body, but ironically seems to do a better job of highlighting muffin tops. You can buy an arsenal of shelf tank tops that reduce you to an unsupported uniboob. Not a good look.

The most important bit of advice that I would give to any new mom who is going to be nursing and pumping: buy some real, quality bras at a boutique where they fit you for them.

What I have found to work really well is layering. My biggest daily fear from pumping at work is getting walked in on by a coworker (HAHA, just kidding, modesty went out the window after the 3rd hour of pushing). Layering works to keep you warm and most importantly, provides ease of access. Seriously, if your day job is anything like mine, you want to get in, get out and back to your desk before anyone notices you were gone.

Now, onto the outfits:

20130530-074411.jpg

This is a pretty basic, go-to outfit for me. I’m wearing a JCrew denim pencil skirt, a Loft top with a Loft short sleeve sweater and of course, my hippie shoes because high heels and carrying a car seat – not happening. What you don’t see in this picture is the Old Navy stretch tank underneath. They are KEY. I buy them in bulk in every color available. They don’t lose their shape during the day and I’ve worn them as maternity tanks to now. I can easily get myself set up for pumping while not exposing my entire post baby stomach.

20130530-074403.jpg

I don’t know that I could get my husband on board with this but I believe that you really can’t have enough chambray shirts in different shades of blue. They are so versatile and cute. Here I am wearing a Tommy Hilfiger chambray shirt (a TJ Maxx find), a gold skirt with pockets from the Talbots outlet, a Chewbeads necklace and bracelet, some assorted mixed metal bangles and of course, an Old Navy stretch tank underneath (not pictured). Also not pictured, my other leg. I’m still trying to figure this whole selfie in a mirror thing out.

20130530-095441.jpg

This is a vintage orange paisley dress I picked up at the English Building Market in New Haven, CT with a gold belt from the Talbots outlet, a Navy Chewbeads bracelet with my standard assorted metal bangles and not pictured, you guessed it, an Old Navy tank. You might not think a dress could work for pumping unless you are into hiking that sucker up and over your head. However, this dress zippers in the back!

And my last outfit to show you:

20130530-074420.jpg

Old Navy stripped pencil skirt (stretchy!) with an Old Navy short sleeve sweater, H&M brown belt with an H&M coral scarf tied to be infinity looking, plus my usual bracelets and a tank.

There you go, ladies! You too can still look stylish while you are doing pumping/nursing!

-Kate

Spring has finally arrived!  My birthday is at the end of March and I cannot remember it being this cold this late in the year ever.  Thankfully, the emergence of some really nice weather in New England, was timed perfectly with my first Mommy night away.

When I met Justin, I didn’t realize that he came with a pretty impressive friend circle.  Luckily, I’ve become close with his girlfriends from college and for the second year in a row, I’ve been invited to join them on their yearly girl’s weekend.  Last year we went to the Norwich Inn and Spa.  I was pretty pregnant, so my fun was limited to a pregnancy massage and a nap.  This year, since no one was expecting, we headed to Long Island, New York to check out their wine trail.

The best way (and most fun) way to get from Connecticut to Long Island is by ferry.

20130409-101343.jpg

Who doesn’t love taking a boat?

We were booked for one night at the Cliffside Resort, a beautiful condo complex overlooking the Long Island Sound.  I pulled out google maps to see what part of Connecticut I was looking at from our room and it is directly across from Old Saybrook (former home of Katherine Hepburn).  The brightly colored Adirondack chairs on the lawn must be a lovely spot to watch the sunset, cocktail in hand during the summer time.

20130409-101337.jpg

Early April is still the off-season, so we had the place almost exclusively to ourselves.  We can be a bit loud, so this was not a bad thing.

We didn’t spend much time in our hotel room before we headed off to hit the wine trail.  My favorite stop by far was Sparkling Pointe.  They only make sparkling wines.  Yum!

20130409-101251.jpg

The ambiance was perfect too.  Perhaps too perfect, because I came home wanting to repaint our entire house the same lovely gray they had on their walls.  I also came home coveting the Michael Kors gold watch, but that is a story for another day.

20130409-101223.jpg

Just one of the amazing perks of the weekend was getting to spend time with the amazing, Robyn of A Modest Life.

20130409-101332.jpg

If you are in the Boston area and looking for a stylist/personal shopper, you could not possibly do better.  After all the wineries, we had a stopover on the beach for a sunset cocktail, some rock picking and an impromptu photo shoot.

photo (2)

20130409-101326.jpg

The next morning came faster than a mommy looking to catch up on oft missed sleep would have wanted, but I was ready to hit the road bright and early, so bright and early in fact, that I managed to catch the sunrise over the water.

20130409-101318.jpg

20130409-101313.jpg

20130409-101307.jpg

All in all, it was the perfect getaway with the perfect group!

20130409-101257.jpg 20130409-101355.jpg

-Kate

There is an agreement that one has to sign when they decide to pursue adulthood in New England.   It will be very hot in the summertime and it will be a cold, snowy mess in the winter.  If you don’t like it, you are free to move to the promised land, aka San Diego, but otherwise, you kind of just have to shush your mouth and deal.

I’ve got serious ants in my pants for some outside time.  It has been way too long since our beach looked more like this:

20130308-120203.jpg

and less like this:

20130308-120309.jpg

I’ve tried to think of all the fun, warm weather stuff that is just around the corner and remembered that I never told you about my beautiful sister-in-law’s bridal shower last summer.

20130308-120239.jpg

I was the hostess and as such, got full and complete control over decorating.  I LOVE party planning.   Love it.  For Katy’s (that’s my sil) shower, I actually started collecting stuff for decorating months beforehand.  It was like curating an art show, each little piece was thoughtfully selected.  The party was held at our beachfront club house, so I stuck with the beachy chic theme for the event.  I stalked e-bay for beach glass colored tulle and was rewarded with a football fields amount.  I created a Pinterest board just for ideas.   I had visions of sheer curtains floating over the guests heads with beautiful tulle twisting around everything in an ethereal dream scape.  Had I known that the tulle would end up being a total nightmare and the ephemeral feel would turn slightly weird and dangerous because the hand weights we had to hold it in place kept crashing down to where people would be standing later, I would have stepped away from the e-bay auction.  It was a learning moment and in the eleventh hour, we scrapped the sheer overhead curtains for safety’s sake.

20130308-120255.jpg

I made sure to incorporate a lot of what I already had on hand so that I could put more of the budget towards the food [and booze].  I busted out my army of blue mason jars and hung starfish from them with twine.   I had bought a ridiculous amount of starfish off of the internet and when they arrived, they completely freaked our dogs, Piper and Neuman, out.  I wasn’t expecting that, so they got several days of freebreeze and fresh air before they came back into the house, the starfish that is, not the dogs.

20130308-120217.jpg

I stuck the starfish into my giant Ikea lanterns around tall pillar candles.

20130308-120209.jpg

Lemon sugar cookies in the shape of starfish and sailboats with gold sprinkles were baked and packaged up for favors with pretty, beachy colored ribbon and some chocolate kisses.

One of my absolute favorite parts of the party were the floral arrangements.  Thankfully, the party was right smack in the middle of peak hydrangea season.  We had giant clusters of the most beautiful deep purples and blues.  My kitchen looked like a jungle for a few hours while I wrangled everything into containers.  Since our neighbors sometimes pop in here to read this, I feel it is important to mention that no neighborhood hydrangea were hurt in the making of this blog post and/or party.

20130308-120302.jpg

20130308-120248.jpg

I thought it would be a lovely idea to feature pictures from the bride’s childhood on the beautiful stone fireplace in the room.

20130308-120231.jpg

I enlisted the help of my mother-in-law and grand-mother-in-law to provide pictures which I then put into frames and put all over the fireplace.  I was also able to incorporate the flowers, lanterns, and that silly tulle and some of the living dead starfish too.

After:

20130308-120223.jpg

It was a rainy night outside, but inside it turned into a great evening celebrating the marriage of my amazing sister in law.

I have a feeling that before we know it, the beach will be back to looking like this again too.

beach

I can’t wait!

-Kate

Tweak Tweak

You know how you should never tempt fate without knocking wood?   Saying that I thought we were just about done with the dining room, well, that was just silly on my part.   From here on out, I will accept that the house is always evolving and changing with us.

So, when last we spoke, Justin and I were lovingly debating whether the back wall in the dinning room needed anything else.

I smugly said no.  I was wrong.

Joann Fabrics was having an excellent sale this past weekend and I was there picking up fabric for a side project I will soon be sharing with you.  Justin and Audrey came with me and when I let Justin out of my sight for a few minutes, he came back with a literal arm load of picture frames, all 1/2 off.  That man of mine sure can spot a bargain!


So much for the bead and batten board.  I have to say though, I think I like this better.

-Kate

The best house projects are the ones that Justin gets involved with. It automatically skips the steps where I have to lobby for an idea or theme. Case in point, the dining room.

dining room

Our first joint purchase as cohabitators in 2006, was the bistro dining room table.  We bought that together and our parents each bought us chairs.   It was a fun set to have for entertaining and we used the extra two chairs to eat at the kitchen counter.  Unfortunately though, we realized quickly that a) you couldn’t substitute in a regular height chair for larger dinner parties so someone was either standing or eating at the coffee table and b) a little person would never be able to get up in the chair on their own for meals.  Also, Neuman and Piper the dogs had both done a number on the foot rest part of the chairs during their chewy puppy phase.  It was not pretty.

Luckily, I had a great family heirloom table waiting for me in my parents’ basement.  When we made the switch, we kept three of the bistro chairs, the three that hadn’t been chewed to bits by wild animals, with the intention of painting them white.  So far I’ve got one chair kind of spray painted.  I am so out of my depth with spray painting, being a tried and true paint brush kind of gal.  That will be a project for the warmer months.

While we were making changes, the $20 chandelier had to go too.   I’ll always have a soft spot for the old guy.  He was Justin’s first attempt at home electrical work and he knocked out power to the back of the house during the install.  Sam the local electrician had to come in to bat clean up.  In Justin’s defense, Ikea light figures are notoriously a bit wonky to install.

Justin actually picked the new chandelier out. It ties in beautifully with the brushed metal knobs and light fixture in the kitchen.  Time and experience has made him an excellent amateur electrician, so this install was a breeze.   Although, looking at the pictures, I think we might need to add a few extra rings to drop it down a bit.   I had also painted the ceiling white which makes the room look a lot brighter.

20130227-103940.jpg

In January, Justin, Audrey and I happened to be in Ikea in New Haven shopping for who knows what and on our way to the check out, out of the corner of my eye, I spotted a turquoise chair. I love the color turquoise and use it as an accent color all over the house. The chair was the absolute perfect color but and this was a big but, it was a metal folding chair.

frode-folding-chair__0156177_PE315312_S4

I had never seen a turquoise chair before and definitely never seen a turquoise folding chair. I knew immediately though that a funky fun chair would work with our very classic looking dining table. While we didn’t actually fight, there was a mooning and some serious discussion about the chairs in the Ikea warehouse that day and in the end, we left with only two of the chairs for a “trial run”. A few days later two more chairs appeared. In a perfect world, I’d love to have six, but marriage and decorating is compromise. Trust me.

20130227-103946.jpg

Now that we’ve gotten the room mostly complete, someone thinks they might want to install some bead and batten board this weekend.  Well, I’m on board with that.  Ha Ha.

20130227-103952.jpg 20130227-103958.jpg

One last thing, Justin wants to put something in the corner of the room in between the window and the floating shelves.  I say no, but what do you think?

-Kate

Pinterest strikes again! I’ve seen a lot of really great closet makeovers lately that have had me drooling. I don’t know how else to describe it, but I literally seem to get a buzz off of a good organization project. There is nothing like it.

Baby Audrey’s closet has been a nightmarish mess for months now. It didn’t bother me so much until we actually moved her into her room to sleep and I now spend a good chunk of every day hanging out in there with her. The closet mess had become unavoidable.

Following a link on a Pinterest Pin, I found a great Rubbermaid Closet kit. I Jedi mind tricked Justin into going out with me to get it. (He needed lightbulbs for his own weekend project: installation of a new dining room chandelier.)

I’m going to be very real with you now and show you the before picture of the closet. Honestly, it wasn’t until I looked at the picture again after everything was finished, that I realized how crazy it looked. All of that stuff crammed in there, no space, no order.

20130224-183610.jpg

As you can see, the baby’s clothes are kind of hung up in size order, but everything was so tightly packed, it was hard to see what she has. As I’m sure most new moms will tell you, they grow so quickly, that it is easy to miss clothes just because you don’t see them.

20130224-183617.jpg

First I needed to clean everything out.

20130224-183542.jpg

Audrey helped out a bit by making me laugh. Her fuzzy orange toy is very soft and she likes to smoosh her face into it. It also makes this terrifying noise and I’m grateful that she hasn’t figured out how to turn it on yet.

Once I got everything out, it was time to bust out my 7th grade shop class skills. I’m glad I paid attention during the ruler class. This was my first solo project with a drill. Thankfully, since it was a closet project, an extra hole or two (or 4) would be hidden.

20130224-183525.jpg

Measuring and hanging the brackets took the longest. I am not ashamed to admit that I pulled up a YouTube video on how to insert a drill bit. Now that I’ve got that skill down, I can’t wait for my next project. Anyway, brackets were up and it was time to figure out a set up that would work for little people clothing, but also give me some useable shelving space. As you can see from the hideous before picture, we also use Audrey’s closet for storing our bed linens. I’m sure there will come a time when my adorable little person needs every inch of her closet for her own stuff, but for now, she can share.

20130224-183518.jpg

The reason I wasn’t upset about having to drop just under $100 on this set up is that everything is adjustable. If a month from now, something isn’t working or I want to add more shelves, I can do that. The earlier set up of one bar across and one shelf didn’t give me access to the most space.

20130224-183510.jpg

With my two foot tall boss looking on, I started loading stuff back in. I tried to be thoughtful about the process. I used the two racks to the left for her current wardrobe and the rack to the right for the stuff that she’ll fit into later. Our linens still found a spot up on the shelves but I also put her collection of hand knit blankets, a basket full of toys and the various baby wearing devices all up on shelves too. I had enough leftover room in the back corners for the stuff we don’t often use, like my collection of gift bags (who needs a baby themed gift bag? I got em!) and diapers. The best part, I had gotten so much stuff up and off the floor of her room and I still had plenty to spare on the floor of the closet.

Here is the final look:

20130225-084945.jpg

Ahhhh…now that felt good, so good in fact that I didn’t want to close the doors so I could keep looking at it. The other closets in the house should be very nervous. This was definitely an easy to do makeover!

-Kate

Well, hello there.  You know what?  I’ve missed you.

When we last spoke, I told you that I was going to set up a nursery.  Well, I did that and then pushed out a person to live in aforementioned nursery.  I bet you want to see pictures, of the kid and not the actual pushing.  I often wonder what the first generation of kids in the post blogging/face.book world are going to say about their every move being documented on the internet and an online presence being established on their behalf without their consent. I know for me, it makes me feel…icky.   So how about for now, I just tell you how cute and smart she is and we’ll see about posting pictures of her later.

Other stuff that has made me feel off lately is this constant push among home blogs to always be buying stuff and never being satisfied with the state of one’s home. A bit of change now and again, streamlining to make your life easier, I’m totally on board with, but stalking each flash sale for another accessory to put on a side table or suddenly feeling bad about your home because a gray stenciled wall isn’t in this season? Forget it.

Redefining decor is about being happy with what you have, making it work for you, not against you and most importantly, not becoming a hoarder of clutter disguised as “decorating”.

All that being said, I haven’t stopped doing small improvements here and there.  In fact, we took our I.kea coffee table that Piper the dog had chewed the corners off and turned it into a lovely tufted ottoman.  My husband Justin  helped with this and did some of the stapling and even made the buttons! Bonus: we no longer have to worry about sharp edges for when our little person starts walking.

20130220-102939.jpg20130220-102952.jpg

And I also took our plain jane builders mirror in the guest bathroom and added a tile border.

20130220-102918.jpg 20130220-102856.jpg 20130220-102837.jpg

What have YOU been up to?  (p.s.  I really did miss you.)

-Kate